
Python is quickly gaining popularity as a coding language, and many well-known frameworks are built on it. Django is one of them and it offers a lot of features and auxiliary libraries.
A rising Python web framework called Django makes it possible to create safe and dependable websites quickly. Django, which was created by seasoned programmers, handles a lot of the hassle associated with web development, allowing you to concentrate on developing your app without having to invent the wheel.
Create an application for real-time chat with Django Channels. I think that sounds very nice. Learning something new is always enjoyable, so let’s get started!
In this blog, we will understand how to create a chat app with Django. First, let’s understand the basics of Django.
Django Channel Overview
To best gain an understanding for how it works, first lets discuss basics about Django development.
- Channel layers are mostly utilised to develop real-time applications because they enable interaction between several instances of an application.
- Similar to conventional HTTP views, Django Channels makes it easier for Django to implement WebSockets.
- Every time a user is authorized, an event will be sent to almost every connected user thanks to WebSockets (through Django Channels), which manages interaction between the customer and the server.
- Channels wrap Django’s native asynchronous view support, allowing Django projects to handle not only HTTP, but protocols that require long-running connections too – WebSockets, MQTT(IoT), chatbots, and more.
- Channels preserve the synchronous behavior of Django and add a layer of asynchronous protocols allowing users to write views that are entirely synchronous, asynchronous or a mixture of both.
- Django Channels extends the built-in capabilities of Django beyond just HTTP by taking advantage of ASGI (Asynchronous Server Gateway Interface), probably known as the successor of WSGI (Web Server Gateway Interface).
- WSGI provides a synchronous standard for Python web applications, and ASGI provides both synchronous and asynchronous standards.
- ASGI provides an interface between async Python web servers and applications while it supports all the features provided by WSGI.
- Channels bundles this event-driven architecture with channel layers, a system that allows you to easily communicate between processes, and separate your project into different processes.
SCOPES AND EVENTS
- Channels feature an event-driven architecture with channel levels.
- Incoming connections are divided into two parts by channels and ASGI: a scope and a sequence of events.
- The scope is a collection of information that pertains to a solitary incoming connection and endures throughout the connection. For example the IP address of the source of a WebSocket, the path from which a web request was been made.
- The scope of HTTP is limited to a single request. It persists for the duration of the socket for WebSockets. If the socket opens and shuts, the scope is altered.
- A number of things happen throughout the lifespan of this scope. These reflect user interactions, such as providing a WebSocket frame or an HTTP request.
- The Channels or ASGI applications will be instantiated once per scope, and then be fed the stream of events happening within that scope to decide what to do with.
- Within the lifetime of a scope, you will have one application instance handling all the events from it.
- Although Channels provides an accessible overlay over ASGI applications called consumers, you are free to develop a raw ASGI application if you choose.
Elevating Excellence: A Case Study in Progress and Impact
CONSUMERS
Consumers are Django views’ counterparts. Any user who connects to our application will be assigned to the group “users” and will receive messages provided by the server. The channel is deleted from the group when the client disconnects from our app, and the user will no longer receive messages.
- Async and sync applications are supported by this event-driven class.
- When a request or new socket comes in, Channels will follow its routing table, find the right consumer for that incoming connection, and start up a copy of it.
- Consumers are equivalent to Django views, the difference being that they are long-running and hence they support web sockets that need persistent connection.
- The ability to develop these fundamental consumers—individual components that could handle chat messaging or notification—and connect them with the help of URL routing, protocol detection, and other useful features to create a whole application—is made possible by channels.
- Consumers, a comprehensive abstraction offered by Channels, make it simple to create ASGI applications.
- Each event will be handled by code that you create, and Channels will handle scheduling and parallelizing each event.
- Consumers specifically engage in the following actions:
- Instead of forcing you to construct an event loop, organise your code as a set of functions that will be invoked whenever an event occurs.
- Give you the option of writing synchronous or async code and take care of handoffs and threading.
BASIC LAYOUT OF chat_app / consumers.py:

- consumers.py can be modified the way you want your data to be passed and stored. This is just a basic reference to create one.
- For more on consumers: Consumers — Channels 3.0.5 documentation
- Sync v/s Async
- Because of the differences between Channels and Django, we frequently need to switch between sync and async code execution.
- For instance, synchronous code must be used to connect the Django database whereas asynchronous code must be used to use the Channels channel layer.
- Using the asgrief.sync routines built into Django is the quickest reason to switch between these –
- An async wraps a sync function is produced by the function sync to async.
- Async to Sync is a function that converts an async function into a sync function.

ROUTING AND MULTIPLE PROTOCOLS
Similar to core Django, Channels uses a mechanism for routing; given a list of potential routes, it iterates through each one until a match is made, at which point it runs the resulting consumer.
- You don’t want to just write one route and have that be the only thing you can give to protocol servers.
- Channels provide routing classes that allow you to combine and stack your consumers (and any other valid ASGI application) to dispatch based on what the connection is.
- There can only be one consumer per connection since channel routers only operate at the scope level and not at the level of other individuals.
- Routing is to work out what single consumer to give a connection to, not how to spread events from one connection across multiple consumers.
- A single root application needs to be defined and the path is to be provided in the asgi.py file as per Django’s conventions. (There’s no fixed rule as to where to put the routing and the root application, but it is recommended to follow Django’s conventions and put them in a project-level file)
The basic layout of the routing file: chat_app / routing.py

- We call the as_asgi() class method when routing our consumers. This returns an ASGI wrapper application that will instantiate a new consumer instance for each connection or scope.
- This is similar to Django’s as_view(), which plays the same role for per-request instances of class-based views.
The route is then added to the asgi file.
project_name / asgi.py

- Make sure to import the project modules after setting up the settings.

Steps To Create A Chat App
Now let’s check out all the steps that are needed to be followed for creating a Chat app.
CREATE A PROJECT
$ django-admin startproject chat_app
INSTALLATION
$ python -m pip install -U channels
- Add ‘channels’ in your INSTALLED_APPS in project_name / settings.py
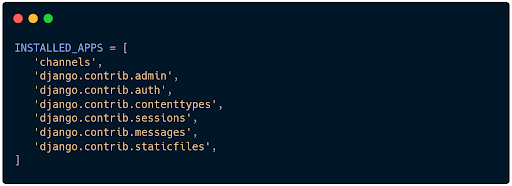
- Install ‘channels’ at the top to avoid any conflicts later on.
- Set up your project’s asgi.py file to wrap the Django ASGI application
Path : chat_app / asgi.py
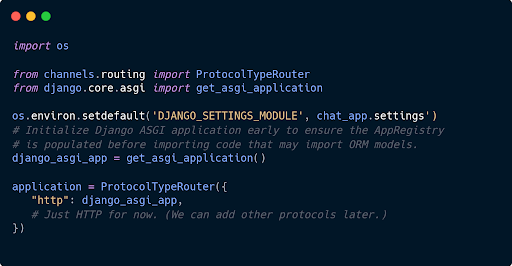
- Finally, make that routing object the root application by setting the ASGI APPLICATION property to that entity.
Path : mychat / settings.py


ENABLE A CHANNEL LAYER
- A specific type of communication system is a channel layer. It enables the communication between numerous consumer entities and other Django components.
- A channel is a mailbox to which messages can be sent to. Each channel has a name. A message can be sent to a channel by anyone who knows the channel’s name.
- Here, we will use an In-Memory Channel Layer
Path : chat_app / settings.py

CREATE THE CHAT APP
- Start an application for your project. Here the name of the app is ‘chat’
$ python manage.py startapp chat
- Add this app to your settings.py file
Path : chat_app / settings.py

CREATE MODELS
- Create models to store the data in the database
Path : chat / models.py

CREATE TEMPLATES
- We will create our first template – get all rooms that will give you a list of users to select and chat with.
- Create a templates directory in your chat app. Within that templated dir, create another directory named ‘chat’ i.e. your application’s name
- Within that directory create a file called ‘index.html’
- Put the following code in : chat / templates / chat / all_users.html
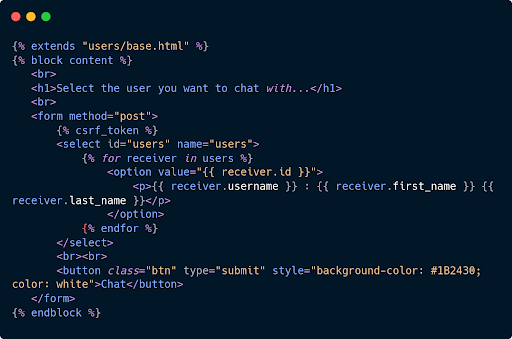
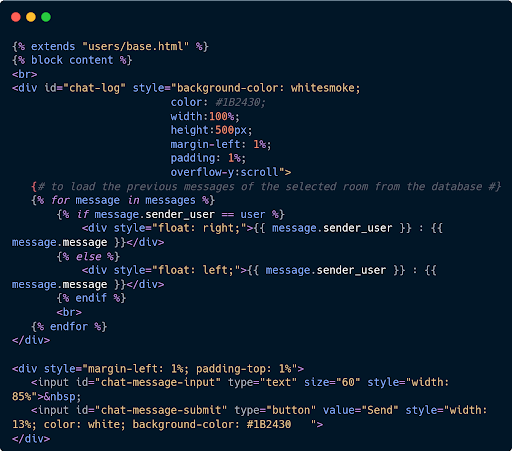
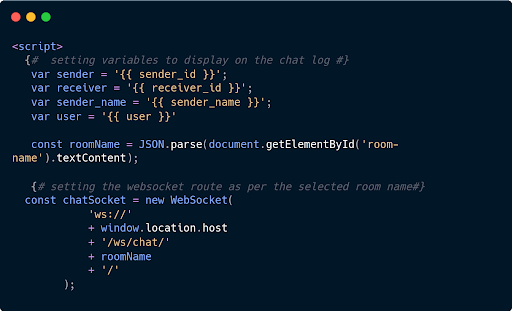
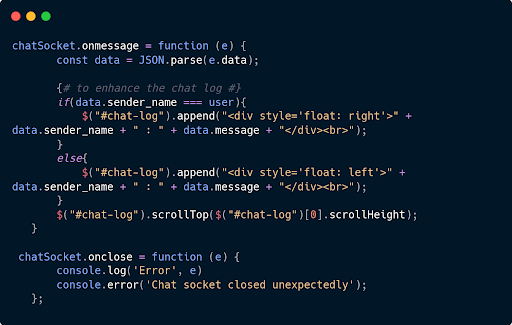
- Next, we will create another template named ‘room.html’ that will open a chat log when a user selects a user to chat with.
Path : chat / templates / chat / room.html

CREATE VIEWS
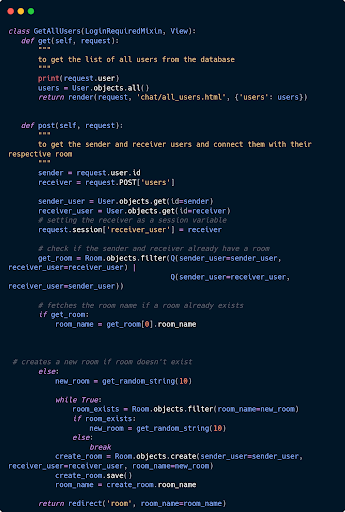
Path : chat_app / chat / views.py

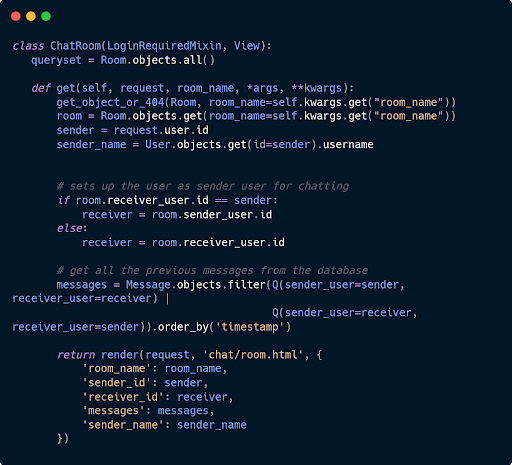
CREATE URLS
- We need to map these views to URLs to call it.
- Create a urls.py file in the chat app
Path : chat / urls.py

- Include it in the project’s urls.py
Path : chat_app / urls.py

- If you run your server and select the user name on the all_users page then you will be redirected to ‘http://127.0.0.1:8000/chat/room_name/’
- That means that you have successfully entered the room but when you try to send the message, nothing happens and the message does not appear in the chat log.
- This is because the room view is trying to open a WebSocket to the URL: ‘ws://127.0.0.1:8000/ws/chat/room_name/’ but we haven’t yet created a consumer that accepts WebSocket connections. You can see the error message in your browser’s javascript console as well.
CREATE THE CONSUMER
- Now when Channels obtains a WebSocket connection, it looks up a consumer in the roots routing setting, then runs many functions on the consumer to manage connection events.
- Create a new file consumers.py in your chat app.
Path : chat / consumers.py

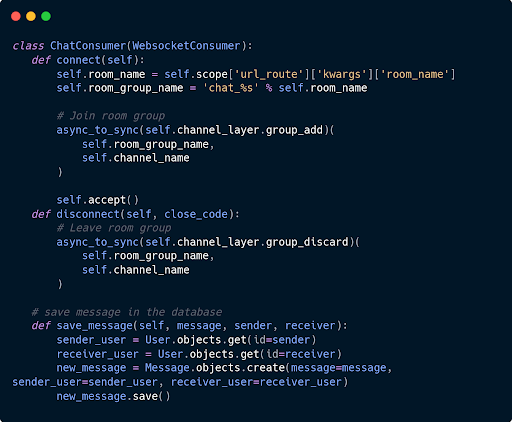
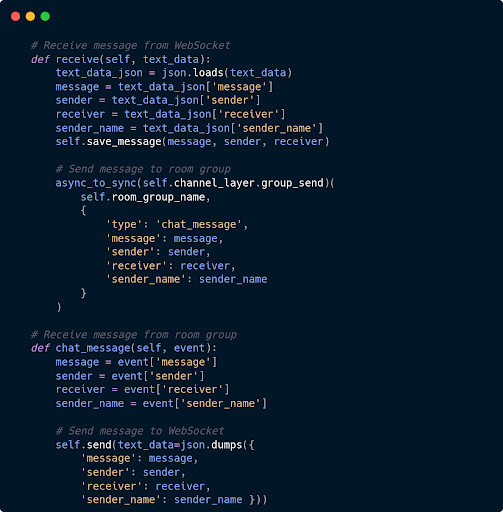
- A JavaScript function will send a message to a ChatConsumer through WebSocket after a user sends a message.
- That message will be received by the ChatConsumer and forwarded to the group identified by the room name.
- Every ChatConsumer in the same group will then receive the message from the group and forward it over WebSocket back to JavaScript, where it will be appended to the chat log.
- For a more detailed understanding about several parts of the ChatConsumer code, refer to: Implement a Chat Server — Channels 3.0.5 documentation
CREATE ROUTE
- For the chat application, we must set up a routing setup with a route to the user.
Path: chat_app / chat / routing.py

- We call the as_asgi() classmethod in order to get an ASGI application that will instantiate an instance of our consumer for each user-connection.(similar to Django’s as_view( ) )
SET UP THE ASGI.PY FILE
- Next, we need to point the root routing configuration at the chat.routing.py module.
- In chat_app/asgi.py import the following and insert a ‘websocket’ key in ProtocolTypeRouter
Path: chat_app / asgi.py
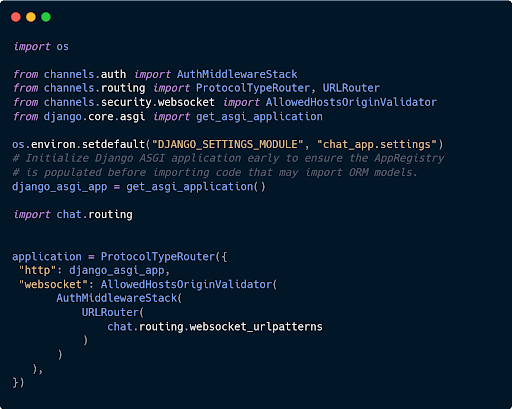
- Make sure to follow the same format as provided above.
- The ProtocolTypeRouter will initially investigate the kind of connection when a request is made to the Channels development server, according to this root routing configuration.
- The AuthMiddlewareStack will populate the connection’s scope with a reference to the currently authenticated user, similarly as Django’s AuthenticationMiddleware.
- Based on the supplied url patterns, the URLRouter will check the HTTP path of the connection and route it to a certain consumer.
- Run migrations to apply the database changes and run the server again to check if our websocket path works.
- Now, if you test your app in two browsers simultaneously, you can see that your real-time chat works!
- Open a browser tab to the room page at http://127.0.0.1:8000/chat/room_name/ and open the same room in another browser.
- In one browser, type a message and press enter. You should see the same message getting echoed in the chat log of another browser as well.
- We have successfully created a fully-functional chat server.

INEXTURE CHAT APPLICATION
https://inexture-chat.herokuapp.com
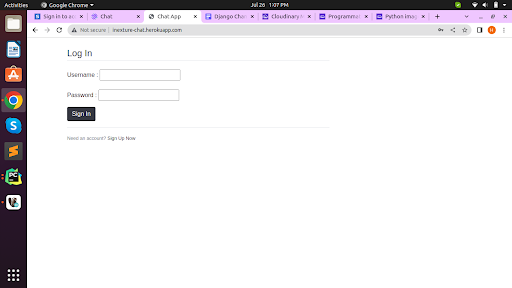
Login Page:
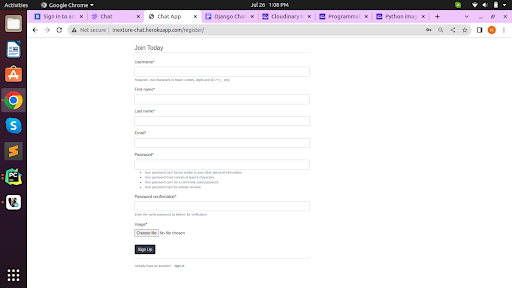
Registration Page:
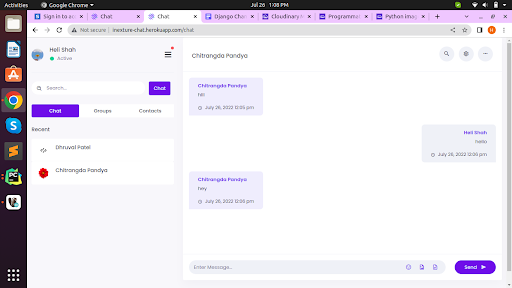
Chat Home Page:
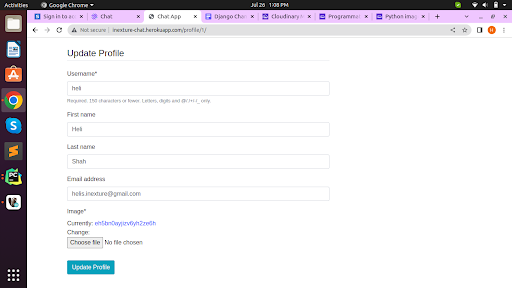
Update Profile Page:
HEROKU DEPLOYMENT
- To deploy our app on Heroku, you must first push your code to a remote Git repository.
- To do so, you need to have at least one commit in your local repository.

INSTALL HEROKU
- Install the Heroku Command Line Interface (CLI) that will let you create and manage your apps right from the terminal.
- For installation follow these instructions.
- After completing, confirm that the installation was successful with this command
$ heroku –version
LOGIN WITH HEROKU
- Login to your Heroku account
$ heroku login
heroku: Press any key to open up the browser to login or q to exit:
- This will open your default browser and redirect you to the Heroku login page.
- After a successful login, you can come back to the terminal.
- To verify your authentication, use command
$ heroku auth:whoami
CREATE A HEROKU APP
- Now, you need to create a Heroku app and integrate it with Git. So you can get a publicly available domain address for your project.
- To create a new heroku app, use the command
$ heroku create app-name
- Remember that your app name should be unique across the entire Heroku platform as it will be a part of your domain name.
- To get a list of your heroku apps, run the command: $ heroku apps
- Next, you need to add a remote named heroku.
$ heroku git:remote –app app-name
- This will add a remote named heroku.
- To open your project on a browser, you can use the link: https://app-name.herokuapp.com
DEPLOY YOUR PROJECT ON HEROKU
- There are some prerequisites to deploy your project on heroku.
- Create a ‘requirements.txt’ file in your project’s root directory that contains a list of all the requirements of your project.
- You can use $ pip freeze > requirements.txt in your terminal for the same.
- Create a ‘runtime.txt’ file that specifies the version of the Python interpreter.
- Create a ‘Procfile’ in your project’s root directory. It instructs Heroku on how to run your web server
Path : chat_app / Procfile

- Remember to commit updates to Git.
- Before pushing it, you need to make a few changes.
- Add the URL of your Heroku app to ALLOWED_HOSTS in the settings.py file
- Also add CSRF_TRUSTED_ORIGINS = [‘https://app-name.herokuapp.com’] in settings.py file.
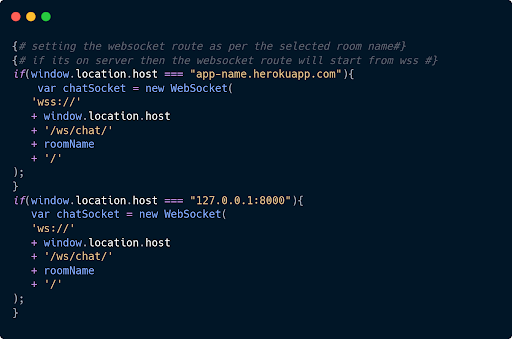
- We have set our WebSocket route starting with ws://, but heroku will pop an error for that as it accepts a route starting with wss://.
- Hence we need to add such a route in the room.html template where we are establishing a WebSocket connection route.
Update : chat_app / chat / templates / chat / room.html
- Now, finally, push your project to heroku.
$ git push heroku master
- After successfully pushing it, open the heroku bash and run migrations to apply the database changes.
$ heroku run bash -a app-name
$ python manage.py migrate
Open your Heroku app on your browser and you’re good to go!
To get proper guidance and insights related to create a chat app with Djangi, you can avail Python Django development services from reputed firms.
Wrapping Up
This is how you can create a fully functional chat app with Django channels. It is worthy to choose Django Python as it is the most preferred programming language of developers. You can hire a Django development company to get relevant assistance.


