logo

Get in touch

Awesome Image Awesome Image

Liferay January 24, 2023

Objects in Liferay 7.4

Written by Mahipalsinh Rana

28,417

Liferay Objects provides a convenient UI for creating custom applications that meet your business needs without writing code. Objects also manages and extends both system and custom objects. This includes adding fields, relationships, actions, layouts, views, validations, and custom states.

System objects are default Liferay applications integrated with the objects framework, while custom objects are definitions created and published by a user.

Note: Available in liferay 7.4+

Creating objects in liferay

  1. Open the Global Menu (), go to the Control Panel tab, and click Objects.
  2. Click the Add button ().
  3. Provide these details for your object draft.
    Label: Identifies the object in the Objects admin and supported application contexts (e.g., Workflow, Display Page Templates, Forms).
    Plural Label: Determines the display name for the object application in the UI.
    Object Name: Determines the object’s definition.name and cannot be changed once the object is published.
    unnamed
  4. Click save. It will created an object in draft state

Editing objects in liferay

  1. From the Objects admin page, click the newly created object draft to begin editing it. Object features and configuration options are organized into the following tabs: Details, Fields, Relationships, Layouts, Actions, Views, Validations, and State Manager.
  2. Go to the Fields tab to add custom fields. Each field represents a database column for storing specific types of values. By default, all objects include these system fields: Author, Create Date, External Reference Code, ID, Modified Date, and Status.
  3. Select an object scope. This determines how the object’s data is stored.
    Company (default): When scoped by Company, the object’s data is stored per Liferay instance.
    Site: When scoped by Site, the object’s data is stored per Site.
  4. Determine whether to show or hide the object’s widget in sites. When enabled, users can deploy the object to a page as a widget.
  5. Click save this will create a new object with the given field

Deleting object in liferay

We can delete draft and published object definitions. Deleting a definition removes its associated data, including the stored entries for published definitions.

Note: 

For versions before Liferay 7.4 U26/GA26, users cannot delete published object definitions.

If a definition has active relationships, you must remove them before you can delete the definition. See Removing Relationships for more information.

To delete a object:

  1. Open the Global Menu (), go to the Control Panel tab, and click Objects.
  2. Click the Actions button () for the desired definition and select Delete.
  3. In the dialog window, enter the name of the definition and click Done to confirm.

Validation in Object

Note: For Liferay 7.4 U38+/GA38+, you can add custom validations to system objects.

Validations set rules for determining valid field entries. Each validation has its own trigger, conditions, and error text, which you can set via the Objects UI. You can define validations using Groovy scripts or Liferay expressions.

To add validation:

  1. Open the Global Menu ( ), go to the Control Panel tab, and click Objects.
  2. Begin editing an object definition.
  3. Go to the Validations tab and click Add ( ).
  4. Enter a label and select a validation type: Groovy or Expression Builder.unnamed (2)
  5. Click Save.
  6. Begin editing the newly created validation.
  7. Go to the Conditions tab and add conditions to the validation.

    unnamed (3)
    Conditions can include multiple fields and functions for complex validations.
  8. Enter a localizable error message. This message appears whenever the validation is triggered and field entries do not meet one or more of the defined conditions.
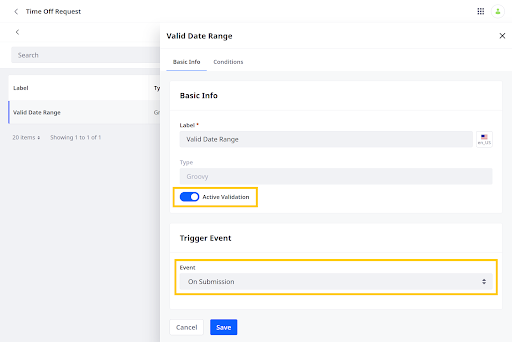
  9. Go to the Basic Info tab and activate the validation.
  10. Select a Trigger Event to determine when the validation runs.
    Each validation can only have one trigger event.
    unnamed (4)
  11. Click Save.

Once activated, the validation runs for all new object entries.

Groovy Script Validation

Groovy validations support all standard Groovy Script capabilities. When defining conditions, you must use the invalidFields variable. Liferay only displays the validation error message when invalidFields returns true.

Example: To valid a student data

Expression Builder validation

Expression Builder provides predefined fields, operators, and functions that you can access in the Elements side panel. Clicking an element adds it to the conditions editor. These functions return a Boolean value. Some functions are: Compare Dates, Concat, Condition etc

Example: To valid email and positive number
unnamed (6)

Picklist

Liferay Picklists are predefined lists of string values that consist of a name/key pair and can include any number of items. Once a list is created, you can add it to Object definitions using the Picklist field type. You can then use this field to filter displayed entries or define custom entry states. If used to define states, you can also associate custom business logic with each state using validations and actions.

Picklists is an application for creating standard lists of values that are understood across the Liferay Portal Development. The process of creating a Picklist includes creating the initial list and adding items to it. Once these values are defined, they can be used in supported applications.

Creating a Picklist

Follow these steps to create a Picklist:

  1. Open the Global Menu (), go to the Control Panel tab, and click Picklists.
  2. Click the Add button ().unnamed (7)
  3. Enter a Name for the Picklist, and click Save. This value identifies the list in the Liferay UI and can be localized after creation.
  4. Click the new Picklist to edit it.
  5. Under Items, click the Add button ().
  6. In the modal window, enter a Name and Key for the item.
    Name: Determines the item’s display name and can be localized after creation.
    Key: Determines the standard value understood by applications in the back-end and uses camel case.
    NOTE
    Once created, an Item’s key cannot be changed, but you can edit its name or delete it at any time.
     
  7. Click Save. This immediately updates the Picklist with the new item.
  8. Repeat the above steps to add additional items to the list.

Adding Picklist Fields to Objects

Once a list is created, you can select it when creating Object fields. Select the Picklist field type and choose the desired list. 

unnamed (11)

Picklist APIs

Liferay provides headless APIs for creating and managing Picklists. You can view available Picklist APIs in Liferay’s API Explorer at localhost:8080/o/api under headless-admin-list-type

unnamed (12)

With them, you can perform CRUD operations for both Picklist Definitions (ListTypeDefinition) and Picklist Entries (ListTypeEntry).

Conclusion

With Liferay Objects, you can build and deliver applications without having to write code or deploy modules. Each application built with Objects is integrated with Liferay’s core frameworks, so you can quickly develop and manage flexible solutions that adapt Liferay DXP to your business needs while maintaining a seamless user experience.

With over 20 years of industry experience, our CTO is a distinguished expert in Liferay Enterprise DXP, AI/ML, and a broad array of cutting-edge technologies including Enterprise Search, ElasticSearch, Java, Spring Boot, .NET, Microservices, Python (Django, FastAPI, Flask), ReactJs, and NodeJs. As a seasoned Technical Architect, he has a proven track record of leading complex, large-scale projects across diverse industries.

Bringing Software Development Expertise to Every
Corner of the World

United States

India

Germany

United Kingdom

Canada

Singapore

Australia

New Zealand

Dubai

Qatar

Kuwait

Finland

Brazil

Netherlands

Ireland

Japan

Kenya

South Africa