
Introduction
There are mainly two ways to implement stripe payment integration
1. Prebuit Payment Page
- This payment provides by the stripe so we do not need to code for it.
- It has all functionality coupons for discounts, etc
- The UI part for the payment integration is fixed. We cannot change it.
- Need to create a product in the stripe dashboard.
- And only passing quantity at payment time total price and discount all those things managed by the stripe.
2. Custom Payment flow
- This flow will use when we have a custom payment page or a different design
- And customization from the payment side and only the user will do payment only not specify any product.
- In this flow, no need to create a Product for the payment.
- Need to create below APIs
- Create-payment-intent API: add payment-related detail in the stripe. It will return client_secret for making payment.
- Webhook
- Need to do the below things from the FE
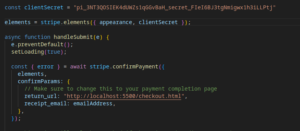
- Confirm Payment: It will take the card detail and client_secret that we got from the create-payment-intent API.
- We are going to use a custom payment flow for the Event Module Payment integration.
Note: In this integration, we will be creating objects, one service Wrapper module of UserLocalService, and one rest builder module.
Object Definition for the Stripe
Introduction
- We are using the stripe for payments but in the feature, there might be clients who will use other payment service provider use.
- So, using two objects we will handle it
- Payment Object that contains unique data like used, stripe user id, type, and relation with Calander Event Payment object
- Calander Event Object contains data related to the Event.
- Payment objects have one too many relations with the Calander Event Object.
Payment Object
| Liferay User Id |
|
| Stripe Customer Id |
|
| Paypal Customer Id |
|
| Type |
Calander Event, Chat |
| Calander Event Relationship |
Calander Event Id |
| Site Id |
|
Calendar Event Object
| Adult Price |
|
| Adult Quantity |
|
| Children Price |
|
| Children Quantity |
|
| Guest Price |
|
| Guest Quantity |
|
| Tax Amount |
|
| Total Amount |
|
| Payment Status |
Failed, Cancelled, Succeeded, Require Action, |
| Transaction Id |
|
| Calander Event ID |
|
| Site Id |
|
P-Flow for the Stripe payment integration
- We will perform the below operations for Stripe payment integration in the Calander event.
- Create a customer in Stripe while the Liferay user gets created.
- Add create a customer in register API
- Also, while the Liferay user gets created using the Liferay admin panel
- Create Payment Intent API for adding payment related in the stripe and take payment stripe ID for confirm Payment
- Add the same detail in the Liferay object with event data (status – pending) while they call payment intent API.
- After creating the Payment Intent API success response, FE will call Liferay Object API to set payment detail in the Object and status pending.
- Confirm Payment with Payment Intent stripe Id, email, and card detail
- Create Webhook API that will call by the stripe while any update is there related to the specified e.
- After successful payment, Webhook API will call to update the status (status – success or failed)
- In webhook based on the switch case, we will update its status in Liferay Object
Custom method for customer management for stripe
private void stripeCustomerCrud(User user, String operationType) {
// If operation type is not equal to create, update, or delete, give an error
if (!Arrays.asList(CREATE_OP, UPDATE_OP, DELETE_OP).contains(operationType)) {
log.error(“Operations must be in Create, Update, and Delete. Your choice is: ” + operationType + ” operation.”);
return;
}
try {
Stripe.apiKey = “your api key”;
String stripeCustomerId = “”;
// Get Stripe Customer ID from the user custom field when operation equals to update or delete
if (operationType.equals(UPDATE_OP) || operationType.equals(DELETE_OP)) {
ExpandoBridge expandoBridge = user.getExpandoBridge();
stripeCustomerId = (String) expandoBridge.getAttribute(STRIPE_CUST_ID);
if (stripeCustomerId == null || stripeCustomerId.isEmpty()) {
throw new NullPointerException(“Stripe Customer Id is empty”);
}
}
Map<String, Object> customerParams = new HashMap<>();
// Add name, email, and metadata in the map when operation equals to create or update
if (!operationType.equals(DELETE_OP)) {
Map<String, String> metadataParams = new HashMap<>();
metadataParams.put(“liferayUserId”, String.valueOf(user.getUserId()));
customerParams.put(“name”, user.getFullName());
customerParams.put(“email”, user.getEmailAddress());
customerParams.put(“metadata”, metadataParams);
}
Customer customer = null;
// Operation-wise call a method of the stripe SDK
if (operationType.equals(CREATE_OP)) {
customer = Customer.create(customerParams);
setExpando(user.getUserId(), STRIPE_CUST_ID, customer.getId());
} else if (operationType.equals(UPDATE_OP)) {
Customer existingCustomer = Customer.retrieve(stripeCustomerId);
customer = existingCustomer.update(customerParams);
} else if (operationType.equals(DELETE_OP)) {
Customer existingCustomer = Customer.retrieve(stripeCustomerId);
customer = existingCustomer.delete();
}
log.info(operationType + ” operation is performed on the Stripe customer. (Data = Id: ” + customer.getId() + “, ” +
“Name: ” + customer.getName() + “, Email: ” + customer.getEmail() + “)”);
} catch (NullPointerException e) {
log.error(“Site custom field does not exist or is empty for the Stripe module: ” + e.getMessage());
} catch (StripeException e) {
log.error(“Stripe Exception while performing ” + operationType + ” operation: ” + e.getMessage());
}
}
APIs and Tasks need to create for the stripe
- Create Customer in the stripe while liferay user gets created
- Params: name, email, and liferayUserId
- It will return user-related data and customer stripe id
- We must update the stripe customer Id in the Liferay user
NOTE: Create Customer in the stripe will call in two scenarios
- In register API
- While the User will create using the Liferay admin panel
- Update Stripe User while Liferay user will update Name, Email, or Liferay userId.
- Delete Stripe User while Liferay user will delete.
- Create Payment Intent API
- Params: Customer Id, Currency, Amount, and Event ID
- Functionality: We will call API to create payment intent API using Liferay SDK. It will add payment-related data in the stripe and return a unique ID for that payment like below.
{
“amount”: 123400,
“amount_capturable”: 0,
“amount_received”: 0,
“capture_method”: “automatic”,
“client_secret”: “pi_3NPlCJSIEK4dUWZs1S8JVSoS_secret_qNlSX4NGn4NVMCcTk8xj9aDcv”,
“confirmation_method”: “automatic”,
“created”: 1688384739,
“currency”: “inr”,
“customer”: “cus_OC8SsIBxziFMm9”,
“id”: “pi_3NPlCJSIEK4dUWZs1S8JVSoS”,
“object”: “payment_intent”,
“payment_method_types”: [
“card”
]
}
Note: Created a rest builder module and created custom apis create-payment-intent, webhook
@POST
@Path(“/create-payment-intent”)
@Produces(MediaType.APPLICATION_JSON)
public Response createPaymentIntent(@RequestBody PaymentDetailsDTO paymentDetailsDTO) {
return userRegistrationService.createPaymentIntent(paymentDetailsDTO);
}
Below is the custom logic for payment intent
public Response createPaymentIntent(PaymentDetailsDTO paymentDetailsDTO) {
try {
Stripe.apiKey = “custom key for user”;
/* Multiply 100 with the amount because Stripe converts the amount from the standard currency unit
to the smallest unit (cents or pence) used by Stripe. */
long amount = paymentDetailsDTO.getAmount() * 100;
// Set data in the PaymentIntent Object
PaymentIntentCreateParams params =
PaymentIntentCreateParams
.builder()
.setCustomer(paymentDetailsDTO.getCustomerId())
.setSetupFutureUsage(PaymentIntentCreateParams.SetupFutureUsage.OFF_SESSION)
.setAmount(amount)
.putMetadata(“Liferay Calendar Event Id”, String.valueOf(paymentDetailsDTO.getCalendarEventId()))
.putMetadata(“Liferay User Id”, String.valueOf(paymentDetailsDTO.getLiferayUserId()))
.setCurrency(paymentDetailsDTO.getCurrency())
.build();
return Response.ok(new ResponseDTO(Response.Status.OK.getStatusCode(), “Payment Intent Created Successfully”, setPaymentIntentToDTO(PaymentIntent.create(params)))).build();
} catch (Exception e) {
log.error(e.getMessage());
return Response.status(Response.Status.INTERNAL_SERVER_ERROR)
.entity(new ResponseDTO(Response.Status.INTERNAL_SERVER_ERROR.getStatusCode(), “Payment Intent is not Created”, null)).build();
}
}
Webhook API
- Params: payload and request
- This API will call when any update is there for the specified payment
- We must update the Liferay Object according to the status of the payment Intent Object. A few statuses are below of Payment Object
- payment_intent.amount_capturable_updated
- payment_intent.canceled
- payment_intent.created
- payment_intent.partially_funded
- payment_intent.payment_failed
- payment_intent.requires_action
- payment_intent.succeeded
APIs wise Flow for the Stripe payment integration
NOTE: Only card payment is available.
Create Payment Intent API
- Using Payment Intent API, we insert transaction data and status as incomplete in the stripe, so it takes a few parameters like Liferay user id, calendar event id, stripe customer id, total amount, and currency. It will return the payment Intent id and client secret.
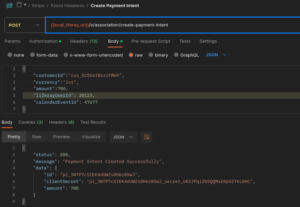
Get User Payment Detail Id if Not Prent Then Add
- Get the Parent object Id from the below API for passing it into
- We need the id of the parent object to make a relationship so we will call the user payment details headless API by passing the Liferay user id from the session storage. It will return the id in the items for the POST eventpayments API.
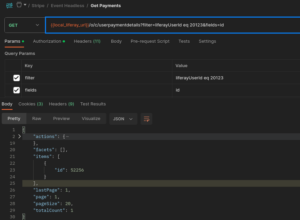
- If the above API items tab is empty, then you need to add user-related data in the user payment details object and take the id from the response and pass it in POST eventpayments API.
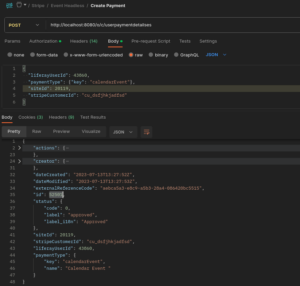
Add Data in Calendar Event Payment Object
- The calendar Event object is used to track the event payment transaction data in our database.
- To add an entry in the calendar event object after the payment intent success response because we are passing payment intent id as transaction id in the Object.
- Add prices, quantity, payment status (default – in Complete), tax amt, total amt, transaction Id(Id from the create payment intent response), r_event_c_payment_id(id from the userpaymentdetails headless API), site id as 20119 as default value.
Confirm Payment and get Publishable Key for Stripe Payment
Stripe Publishable Key
- Stripe SDK or Library needs Stripe Publishable Key.
- So basically, the Flutter team will call POST /api/jsonws/expandovalue/get-data and store it in the session storage or other. Now whenever needed then they will just fetch from the storage.


Confirm Payments
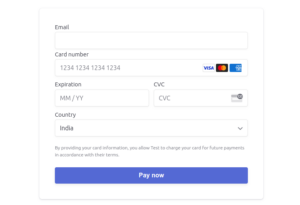
- The Flutter team will take card details and client secret from the create payment intent API and pass it confirm() method and also specify the return URL.
- Stripe will update the status on Webhook automatically after confirming payment.
- We have created confirm page using JavaScript.
Conclusion
Integrating Stripe payment functionality with Liferay Development has proven to be a seamless and efficient solution for businesses seeking to streamline their online payment processes. By implementing this integration, businesses can offer their customers a secure and convenient payment experience, leading to increased customer satisfaction and loyalty.


