Building a Secure Spring Boot...
November 4, 2025

It is critical to upgrade the software versions as they are necessary in businesses to enable the businesses to enjoy new features and work faster as well as remain secure. Moving from Liferay 7. 0 to 7. This can be e. g. 4. This implies an enhancement of the browser’s functions and especially a solid backing up for the newest Web standards. In this blog post, we will try to tell you what you can and what we can do to switch from Liferay 7. 0 to 7. 4 smoothly. We strongly believe that you might need some additional information and means to get the best from Liferay 7. 4.
Data migration is the process of transferring data from one database to the other. This can be from one format of a database to another for example from Oracle to MySQL or even migrating from one version of a database to another. It is a crucial step necessary to ensure that all the data gets transported over without being lost.
The process includes two main parts: schema migration and data migration. Data migration actually involves transferring the data while at the same time comparing it with the source one to ensure that it is all correct while schema migration is an alteration of the structural nature of the data required to have it fit in the new database. Handling database migration requires proper preparations for the processes to ensure that there is no downtime and no loss of data. This is usually to enhance productivity, cut down unnecessary expenses, or adopt a new technology.
Learn More: CI/CD Pipeline Integration for Liferay with Jenkins
Before diving into the migration process, safeguard your data by taking a backup of the Liferay 7.0 database. Then, follow these steps:
1. Setting up Liferay 7.4 Instance: Begin by setting up a new Liferay 7.4 instance.
2. Configuring Database Properties: Incorporate Liferay 7.0 database properties into the Liferay 7.4 portal-ext.properties file.
3. Adding New Database Details: Append the details of the new database created earlier.
4. Updating Company-related Properties: Append company-related necessary properties to the portal-setup-wizard.properties file of Liferay 7.4.
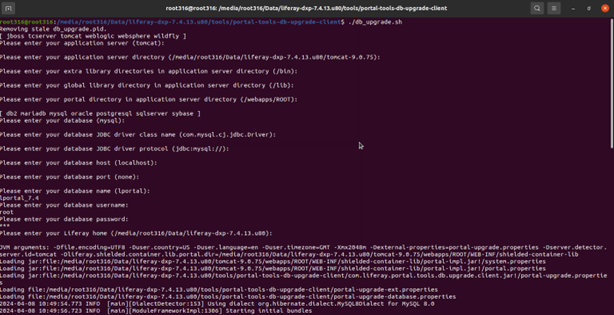
5. Executing Database Upgrade Script: Navigate to the portal-tools-db-upgrade-client directory and execute the sh file.
Path: [Liferay:Home]/tools/portal-tools-db-upgrade-client/
6. Responding to Questions: Respond to the questions prompted during the upgrade process.

7. Restarting the Instance: Now, restart the new Liferay 7.4 instance.
Upon completion of these steps, the data and components of Liferay 7.0 will seamlessly transition to the 7.4 instance
Learn More: What is a WebSocket? Real-Time Communication in Applications
To deploy all documents and media files in the new Liferay instance, follow these steps:
Path: [Liferay:Home]/bundles/data/document_library
Document Library in Liferay 7.4
Path: [Liferay:Home]/data/
Before migrating themes, ensure the Node version and Gulp version changes:
npm install –save-dev liferay-theme-tasks@8.x.x
gulp upgrade